 appStalkers All About Apps & Phones In One Place
Creating documents can be a bit tedious at times. You can spend hours working, writing and trying to make your ideas seem more exciting for the reader. Yet at the end you still end up searching for something to tie it all together nicely. If you want to hone in your document making skills, so that you don’t end up with a document that bores the reader and loses their attention. You might want to learn how to add shapes in Google Docs, once you master this you can begin to create documents that use all kinds of content (e.g. images, drawings,).
You can add all kinds of shapes in Google Docs like arrows, callouts, squares, stars, and flowchart shapes. All of these shapes are customizable, you can add text, change size and color.
This will allow you to hold on to your reader’s attention, so without any further ado let’s get into it.
[lwptoc]How to Add Shapes in Google Docs
- First you open up your Google Docs document, click on Insert from there you go to Drawing and select New.
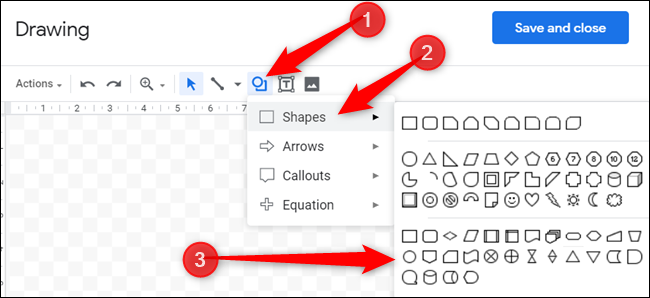
- Here the Google Drawings window will appear and from the menu you should select the Shapes option.
- In the Shapes drop-down menu you can select what shape you want.
- Once selected you can drag the shape in the drawing area and shape it to the size you want.
- When you release the mouse the shape will appear, if you want you can add more shapes. Once you are done with your drawing you click on Save & Close.
- The shape will now appear in your document.
- If you want to delete a shape from your document you select it and press backspace or delete. If you want to edit a shape you select it and from the options below it press Edit.
Adding Shapes in Google Docs by Using Special Characters
If you want to add shapes directly to the text, you can do it by using Special Characters. These can be formatted like standard text, with color, font and sizing.
- Open your document and select Insert and then Special Characters.
- In the Insert special character windows that will pop-up you can search through the characters to find a shape that you would like to use. You can also use the search bar to locate shapes. As well as the drawing tool beneath the search bar so that you can draw your shape and find it that way.
- If you want to see the description of the special characters you can hover over one of them. To use the character you can select it and that will insert it into your document.
- To edit the special character you can use the formatting bar menu, this will allow you to change its font, font size, emphasis, and color.
How to Add Shapes in Google Docs Using Images
Using images will allow you to make more creative shapes in your documents.
- To upload an image in your document, select Insert then click on Image and then select Upload From Computer.
- Use the Windows File Explorer window that will pop-up on your screen to find the image you want to use and upload it. Once it’s uploaded Google Docs will insert it into your document.
- When the image is inserted you can resize it directly in the document. You can also add transparency or borders by right-clicking the image and clicking on Image options. This will open a menu on the right with which you can edit your image to be more to your liking.