 appStalkers All About Apps & Phones In One Place
All of us face problems in the alignment and the order of the text in Google Doc s in some way or the other. At times, even if the content is written accurately, we aren’t able to wrap the text in Google Docs properly which disturbs the presentation of the whole document and it gets a bit frustrating as well when you are putting so much effort into editing the document and yet it isn’t looking the way you want it to be.
Well, you don’t need to worry now. We are back to talk about a very exciting feature of Google Docs. It is the Wrap-Text feature! You will learn how to wrap text in Google Docs easily and efficiently while addressing all your concerns and you will get to know how the file can be adjusted to your desired template. Let’s begin.
[lwptoc]What Is Text Wrapping?
To be able to know how to wrap text in Google Docs, the first thing you need to know is what exactly is text wrapping and how it can be useful to you. It’s always considerate to understand how Google Docs handles images and what impact it has on the text.
Text wrapping implies that any image inserted into a google document will have the surrounding words and characters adjusted to easily ‘wrap’ around it. If this feature is missing, the text would move anywhere like both above and below the image, leaving blank spaces to the left or right of it. It can even be used to adjust the line to accommodate the image height. By default, the wrap text format is set to off, and inserted images follow the in-line arrangement.

How to Wrap Text in Google Docs: A Step-By-Step Guide
Inserting an image or object into a document is much simpler than positioning and getting them to stay where you want. The wrap text feature in Google Docs does exactly this. It manages the alignment of the text and the images, hence making all of this more manageable.
The wrap text option in Google Docs is similar to the Microsoft version, but it can be still difficult to find since it doesn’t have its menu. To use it systematically, all you need to do is follow these steps, and there you go, already with your document.
-
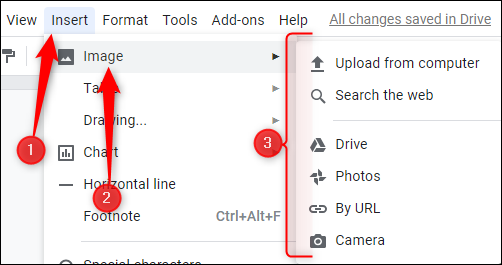
Inserting Images
First of all, to be able to make use of the wrap text option around the image, an image should be inserted. For inserting images, just click insert on the top menu, and you will find the image option. Select the location of the image from where you want to choose and upload it.
-
Selecting Wrap Text Option
Now, to choose to wrap text around the image, just click on the middle icon and select the wrap text option. The wrap text feature is set to in-line by default. The function of the in-line format is to place the image in alignment with the text leaving empty spaces around it always.
With the wrap text feature, you can click and drag the image to be selected from its location. This helps in placing the image according to where you want it.
By default, the margins between the text and images are set as 1/8”. If you wish to change it, you can adjust the margin accordingly to your needs. This can be done by clicking on the Image Margin text box and selecting the desired margin size.
What Else You Need to Know About Wrap Texting
At times, you may get confused about how to wrap text in Google Docs around an image especially for those who have no idea about it. Here are some more interesting options for you to try which just assures you with the right amount of everything you want for your document.
Fix Position Option
Google Docs provides you with a new key feature as well. The Fix position option which is there on the right-hand menu, allows you to select the placement of your image. You can even choose this option by clicking on the dropdown box.
If your image is not aligning with the text, or where you want it, then with the help of Fix Position you can place it anywhere which enhances the whole document.
Choosing Move Feature
It gets irritating when we’re trying to align the text but with it, the image also is moving. We don’t know how to fix this when we have an important presentation at work or if we have to submit an urgent assignment for college.
The option of Choosing Move with Text is here to make our work easy. This helps in adjusting the image accordingly, upward or downward with the paragraph, if the text is added or deleted above the image. With this option chosen, any text added won’t make a difference to the position of the image.
Quick Layouts
If you know how to apply this feature smoothly, then everything is sorted. The Quick Layouts on the menu, gives you the ability to lock images to their position without disturbing the whole formatting of the text.
If you wish to explore more layout options, just click on the left and right arrows and you will see a whole lot of new features.
Why Wrap Texting Is Useful in Google Docs
The wrap text option has many functions to play.
- Firstly, it makes your Google Docs file better to look at
- Secondly, it also reduces the number of pages one uses for files with multiple images. This feature is especially useful if you need to publish your work and also helps in office or college presentations
- The template also makes your documents effortless to read. A well-formatted document with images properly aligned gains attention more quickly than the ones with pictures that split the page