 appStalkers All About Apps & Phones In One Place
When you have a long sentence or text string in a cell in Google Sheets, you will notice that it overflows to the adjacent cells on the right. This is frequently the case when you’re entering sentences or addresses in the cells. That’s when you’ll find yourself Googling how to wrap text in Google Sheets. While working in a spreadsheet, you may enter more data into a cell than space permits. The steps you need to follow are actually relatively simple, as long as you know what you’re preparing.
Wrapping text in Google Sheets is an excellent alternative for styling your spreadsheets and making them more readable. It’s great too because it’s elementary to do.
[lwptoc]Wrapping Text in Google Sheets on an iPad
Google Sheets are renowned for their ability to transcend platforms. For example, if you want to know how to wrap text in Google Sheets on your iPad, the actions are straightforward:
- Choose the cell you want to wrap the text for.
- If you want to select multiple cells in an area, drag the blue selection marker to cover all needed cells. You can match on a row to select all the cells in that row. The same applies to columns.
- You can press the cell above the rows and left of the column markers to select every cell in the table.
- Press the formatting button on the top – it looks like an A with four lines to its right.
- Choose the Cell tab in the menu. Scroll down until you see Wrap text.
- Turn on the Wrap text feature.
- Tap on the sheet to save your changes.

How to Wrap Text in Google Sheets on an iPhone
If you’re entering your sheets through an iPhone, follow a related set of steps:
- Open the Google Sheets App and the document you want to edit.
- Select the cell you need to wrap text in or drag the selection area to include all the cells you need to format. You can select rows or columns by holding on the correct number or letter or set the entire table by pressing the top-left cell (above the row markers).
- Press the formatting button on the top menu.
- Choose the Cell tab and scroll down to the Wrap text option.
- Turn Wrap text on.
- Tap on the sheet to save your settings.
Related: [https://appstalkers.com/appear-anonymous-on-google-docs]
Wrapping text in Google Sheets on an Android device
Knowing how to wrap text in Google Sheets in Android is just as simple:
- Open the document you want to edit.
- Tap the cell that needs to be formatted. You can move the reading area by dragging the blue circle around. You can select an entire row or column by holding on to its number or letter. You can choose the whole table by pressing the cell to the left of the column marker.
- Press the formatting button on the top menu.
- Choose the Cell tab, then scroll down to see the Wrap text option.
- Turn the Wrap text choice on.
- Tap on the sheet to retain your formatting settings.
How to Wrap Text in Google Sheets on a Windows, Mac, or Chromebook PC
If you’re working on a PC, Google Sheets doesn’t have a dedicated app. Despite this, it works perfectly on any browser of your choice. Once you open the document you need to work on, wrapping subject is accessible:
- Click on the cell you want to format. You can select a whole row or column or multiple cells by selecting them together. You can additionally click the top-left cell to select the entire table to format at once.
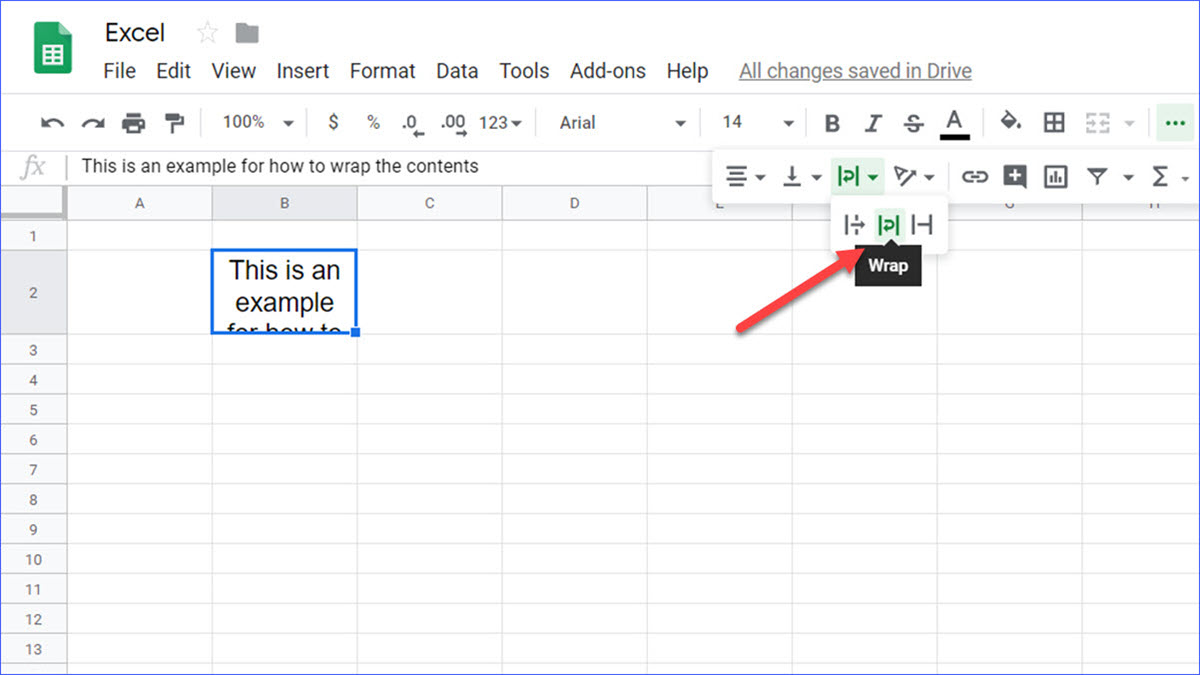
- In the menu on the top, match Format.
- When you hover over Text wrapping, you will see three alternatives.
- Choose the Wrap option to wrap the text and adjust your cell’s height automatically.
- You can select the Overflow option to hold the text flow into the next cell. It might make your table harder to read.
- You can choose the Overflow option to have the text flow into the next cell. It might make your table harder to read.
What precisely does wrapping text in Google Sheets make?
There are three primary forms of text wrapping on Google Sheets:
- Overflow is one default mode in Google Sheets. When this mode is on, any additional text will go over into the following cell. Text overflow will typically make your table hard to read. If the text’s cell overflow is not clear, Google Sheets will visually clip the overflowing content instead. You can match on the cell to show its entire contents in the top menu.
- Text wrapping will modify the height of your cell (in terms of rows) to fit the entire cell’s entire content visually. That means that if one cell in the row has text wrapped around it, all cells of that row will be one row higher.
- Clipping means that any content beyond the current dimension of the cell is hidden. You can click on the cell to show the entire document.